Your church’s management system is Fellowship One. Within Fellowship One, activities are created so that they have the following:
Activities are created to track involvement in church events. One of the ways to track involvement is to take attendance and this can easily be accomplished using Check-in.
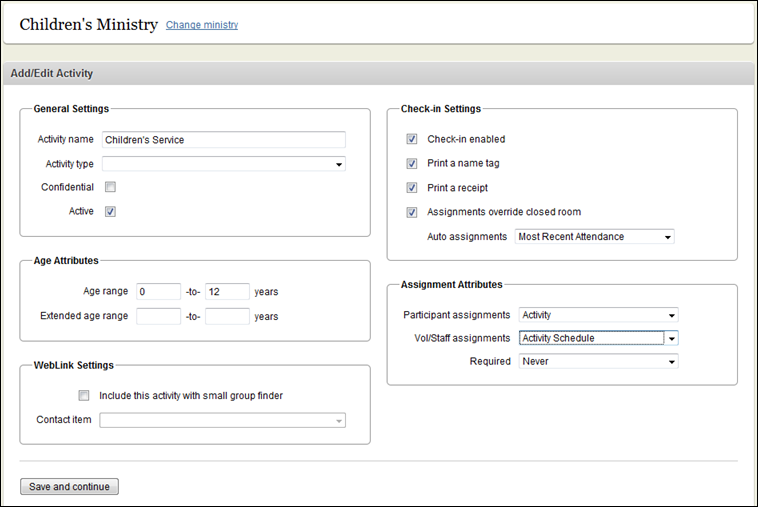
Let’s take a look at the activity settings. In the following image, you can see that a Children’s Service activity has been configured in the Children’s ministry. The names here are examples that we have created for training purposes. Your church can create ministry and activity names to match the events happening on at your church.
This area is where we configure the name of the activity. This name will display in Check-in and on the printed name tag. Additionally, the Check-in code is recorded here and can be regenerated if needed (not shown in the image above).
You may have guessed by now, but just in case, Check-in relies heavily on age. It determines the best location to check a visitor into based on the person’s birth date. The Age Range fields allow you to specify the entire age range of participants in an activity. In the image above, the age range is 0 to 12. Notice that there is an extended age range block that can be completed as well. These fields are optional, but are available if you want to slightly extend the range of the activity. For example, if your frequent attendee Johnny brings his cousin Sam to Children’s Service, but Sam is 13, are you going to allow him in the activity?
This section is the master Check‐in settings control for the entire activity. The general settings of the activity will be used unless the room/location is set to override these settings. The options are as follows:
Note: If you find yourself wondering why a participant keeps checking into the wrong room/location, chances are the Auto Assignments setting is the culprit. Unless you select Most Recent Attendance, Check‐in will not update assignments no matter how many times you select the “correct” room for a participant.
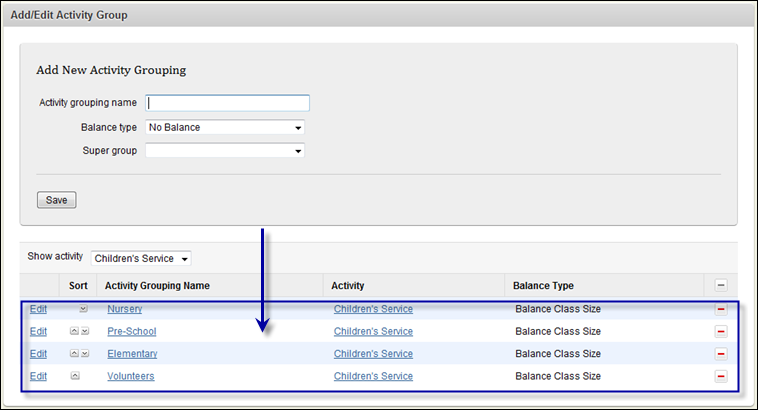
Next, let's look at the setting for Activity GroupA way to logically organize the rooms/locations in your activity for two purposes: Check-in and reporting. These groups can be further broken down into sub groups and sub-sub groupss. The activity groups are optional; however, it's a good idea to always add them because they are required if you are using a Super Check-in.
WARNING: If you are working with Super Check-ins, all activities within a super check-in must have the same structure. Meaning that if one activity has activity groups, then all must have groups. if you experience issues when working with super check-ins, ensure all activities have activity groups. Check out report A7003E—RLCs without an Activity Group to see if any of your activities may be missing a group.
Activity Groups are a way to organize the locations participants check into in a way that makes them easy to find in Check‐in (and in reports). As shown in the image below, our Children’s Service activity is fairly large. We have created activity groups to organize our 30 + rooms ordered by age/school age grouping.
This structure displays in Check-in as shown below:
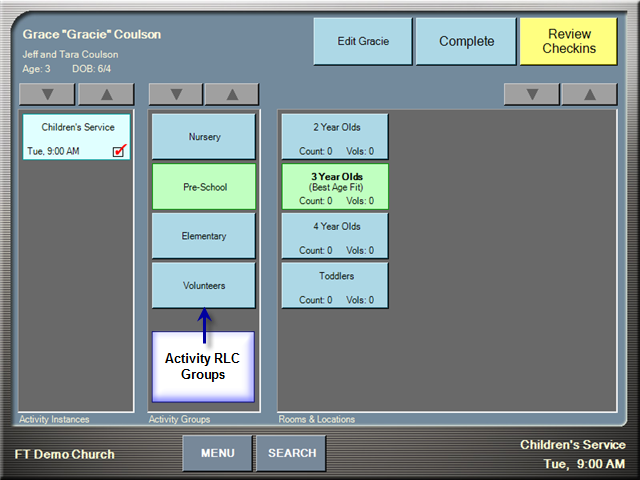
Check-in will first look for an assignment for the person checking in. If an assignment is not found, it will use age range to determine where the participant should go. If necessary, you can change this default selection by touching the correct activity group and then room/location.
Note: You can always change the selection Check-in makes for the participant. If it is incorrect, simply touch the correct path to change it. Remember that Check-in will not remember your change unless the activity has been configured to allow Check-in to update assignments based on Most Recent Attendance. See Check-in Settings above for more information.
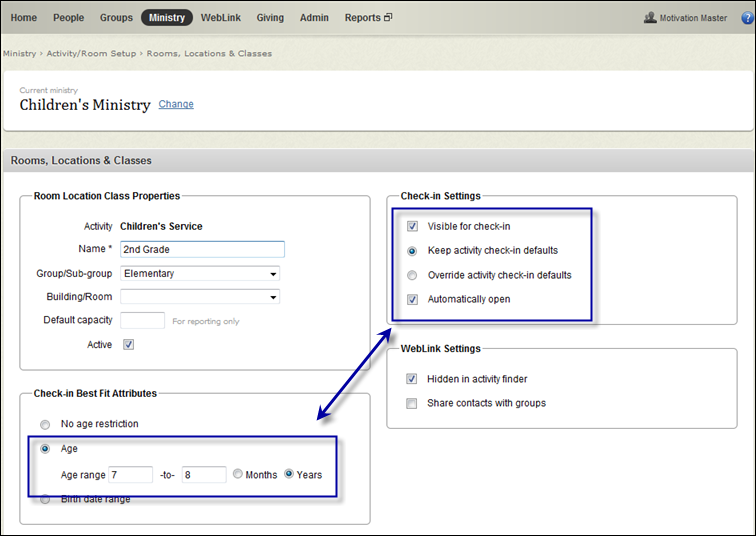
Every activity must have at least one RLC to work in Check-in. The RLC is where attendance is recorded. Depending upon your activity, you may only need one room or you may need many. As we saw in the previous example, activities for children tend to have many rooms to separate participants by age or learning level.
Configuring an RLC includes the following:
As shown in the following image, the 2nd Grade room can have it's own age and Check-in settings that are different from those configured for the activity.
Breakout GroupsAn organizational mechanism used within the activity structure to organize participants outside of rooms/locations. This option is particularly helpful when you have an activity where you want to break up participants into other groups independent of the rooms/locations they have checked into. (i.e., small groups, table groups, boys and girls, schools, etc.) are a mechanism used within the activity structure to organize participants outside of RLCs. This option is helpful when you have an activity where you want to break participants into other groups independent from the RLC a person has checked into (e.g., small groups, table groups, boys/girls, schools, and so on).
Breakout groups display as a code in the upper-right corner of the name tag. The code can be one or many letters (font size scales down as you add more letters). Here are some examples:
Breakout groups must be assigned prior to checking in. You cannot assign a breakout group at the Check-in station; it can only be assigned via a participant assignment created through Fellowship One.
Tip! Keep a sheet of paper beside the Check-in stations and instruct volunteers to print an extra name tag or item tag for any new attendees who have not previously been assigned to a breakout group. Stick the extra name tag on the sheet of paper and make updates at a later time.